Chicken fingers have long been a favorite comfort food for both children and adults alike. Their crispy exterior and tender interior make them a go-to option for quick meals and snack time. But what if you could elevate this classic dish by infusing it with the rich and savory flavors of Italian cuisine? Enter Crispy Chicken Parmesan Fingers—a delightful fusion that combines the beloved concept of chicken fingers with the irresistible taste of chicken Parmesan.
This recipe not only offers a new twist on a familiar favorite but also showcases simplicity in its preparation, making it perfect for busy weeknights or casual gatherings. With a crunchy, golden crust, juicy chicken, and a hint of Italian herbs, these chicken fingers are sure to become a staple in your kitchen.
Understanding the Ingredients
To create Crispy Chicken Parmesan Fingers, it’s essential to understand the role of each ingredient in achieving the perfect balance of flavor and texture. Here’s a breakdown of the key components that make this dish stand out.
Boneless, Skinless Chicken Tenders
The star of this recipe is undoubtedly the boneless, skinless chicken tenders. These cuts of chicken are ideal for several reasons. First, they are naturally tender and cook quickly, which makes them perfect for frying. Second, their shape is convenient for creating finger-sized pieces that are easy to handle and eat. This cut not only ensures a juicy bite but also provides a blank canvas for the flavors of the breading and seasonings to shine.
All-Purpose Flour
All-purpose flour plays a crucial role in the breading process. Before the chicken is coated with breadcrumbs, it is first dredged in flour. This step is vital as it helps to create a dry surface for the egg wash to adhere to, ensuring that the breadcrumbs stick effectively during frying. The flour also contributes to the overall texture, giving the chicken a slightly crispier exterior.
Eggs
Eggs are an essential binding agent in this recipe. After coating the chicken in flour, it is dipped in a beaten egg mixture, which helps the breadcrumbs cling to the chicken. This step is key to achieving that desirable crispy texture. The proteins in the egg also help create a golden crust when cooked, enhancing both the appearance and flavor of the dish.
Breadcrumbs and Parmesan Cheese
The combination of breadcrumbs and Parmesan cheese is what truly elevates the flavor of the chicken fingers. The breadcrumbs provide the necessary crunch, while the grated Parmesan adds a savory richness that is characteristic of Italian cuisine. For an even more delectable result, consider using a blend of plain and seasoned breadcrumbs. Seasoned breadcrumbs can save time and effort by incorporating various herbs and spices, while plain breadcrumbs provide a neutral base that allows you to control the seasoning level.
Seasonings
To further enhance the taste profile of your Crispy Chicken Parmesan Fingers, a blend of seasonings is added to the breadcrumb mixture. Common ingredients such as garlic powder, onion powder, dried basil, and oregano not only amplify the Italian flavors but also add depth to the dish. These seasonings are easily adjustable, allowing you to customize the flavor to your liking.
Quality Marinara Sauce
No chicken Parmesan dish is complete without a dipping sauce. A high-quality marinara sauce serves as the perfect complement to these crispy fingers. The acidity and richness of the sauce balance the savory flavors of the chicken, providing a delightful contrast that enhances the overall dining experience. Opting for a homemade or artisanal marinara can elevate the dish even further.
Preparation Steps
Now that we’ve covered the essential ingredients, let’s walk through the preparation steps to ensure your Crispy Chicken Parmesan Fingers turn out perfectly every time.
Preparing the Chicken
Start by rinsing the boneless, skinless chicken tenders under cold water. This step not only cleans the chicken but also helps to remove any residual blood or impurities. After rinsing, pat the chicken dry with paper towels. Removing excess moisture is crucial for achieving a crispy texture during frying.
Setting Up a Breading Station
An organized breading station can make the preparation process more efficient and less messy. Set up three shallow dishes in a row: one for the flour, one for the beaten eggs, and one for the breadcrumb and Parmesan mixture. This assembly line approach streamlines the breading process, allowing you to coat each chicken tender quickly and efficiently.
Breading the Chicken
To bread the chicken fingers, take a chicken tender and first coat it in the flour, ensuring that it is evenly covered. Gently shake off any excess flour before dipping it into the beaten egg mixture. Allow any excess egg to drip off, then transfer the chicken to the breadcrumb mixture. Press the breadcrumbs firmly onto the chicken to create an even coating, making sure to cover all surfaces. Once breaded, place the chicken fingers on a plate or baking sheet while you repeat the process with the remaining tenders.
By following these initial steps, you are well on your way to creating a dish that combines the comforting familiarity of chicken fingers with the exciting flavors of chicken Parmesan. Stay tuned for the next section, where we will explore the cooking process and tips for achieving the ultimate crispy finish.
Tips for Maintaining Cleanliness and Organization in the Kitchen
Cooking can be a messy affair, especially when frying chicken. To ensure a smooth cooking experience, it’s important to maintain cleanliness and organization in your kitchen. Here are some effective tips to keep your workspace tidy:
1. Prep Your Ingredients: Before you start cooking, measure out all your ingredients and have them ready. This not only saves time but also reduces clutter as you won’t be scrambling to find things while cooking.
2. Use Separate Cutting Boards: To avoid cross-contamination, use separate cutting boards for raw chicken and other ingredients. This is especially crucial when handling proteins.
3. Clean as You Go: Keep a bowl nearby to toss scraps and used ingredients. Wipe down surfaces and utensils as you work to prevent mess accumulation.
4. Designate a Frying Station: If you’re frying, set up a specific area for it. Have all your frying essentials like oil, tongs, and paper towels within reach. This will prevent you from moving around too much with raw chicken or hot oil.
5. Wear an Apron: Protect your clothes and keep things clean by wearing an apron. This simple step can save you from spills and splatters.
Cooking Techniques
Explanation of Frying vs. Baking: Why Frying is Chosen for This Recipe
In this recipe, frying is the preferred method for cooking the chicken Parmesan fingers due to the texture it provides. Frying ensures a crispy exterior while keeping the inside juicy and tender. Though baking is a healthier alternative, it often doesn’t achieve the same level of crispiness. The high heat from frying quickly forms a golden crust that seals in moisture, making it ideal for chicken fingers.
Importance of Oil Temperature: How to Achieve the Perfect Crispiness
Achieving the right oil temperature is crucial for frying chicken Parmesan fingers. The ideal frying temperature is between 350°F and 375°F (175°C to 190°C). Here’s how to ensure your oil is at the perfect temperature:
– Use a Thermometer: An instant-read thermometer can help you monitor the oil temperature accurately.
– Bread Test: If you don’t have a thermometer, you can use the “bread test.” Drop a small piece of bread into the oil; if it bubbles and turns golden brown in about 60 seconds, the oil is ready.
– Avoid Overheating: If the oil is too hot, the coating will burn before the chicken is cooked through. If it’s not hot enough, the chicken will absorb excess oil and become greasy instead of crispy.
Tips for Frying in Batches: Avoiding Overcrowding for Even Cooking
When frying chicken, it’s tempting to cook everything at once; however, overcrowding the pan can lead to uneven cooking and soggy chicken. Here are tips to fry in batches effectively:
1. Cook in Small Batches: Fry just a few pieces at a time, leaving enough space between them. This allows the oil temperature to remain consistent and helps achieve an even crisp.
2. Maintain Oil Temperature: After adding chicken to the oil, allow it to come back to the right temperature before adding more. This ensures that each batch cooks evenly.
3. Use a Slotted Spoon: When transferring the chicken to and from the oil, use a slotted spoon to let excess oil drip off.
Visual Cues for Doneness: How to Tell When the Chicken is Perfectly Cooked
To ensure that your chicken Parmesan fingers are cooked through, look for these visual cues:
– Color: The chicken should be a deep golden brown when done. Avoid removing it too early, as the color is a key indicator of doneness.
– Juices Run Clear: Cut into one of the fingers; if the juices run clear and there’s no pink meat, they are ready to eat.
– Temperature Check: For the most accurate method, use a meat thermometer to check that the internal temperature has reached 165°F (74°C).
Serving Suggestions
Ideas for Plating the Crispy Chicken Parmesan Fingers
Presentation can elevate your dish from ordinary to extraordinary. Here are some creative plating ideas for your crispy chicken Parmesan fingers:
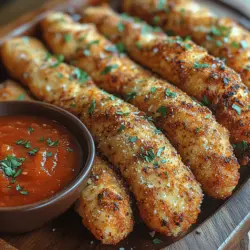
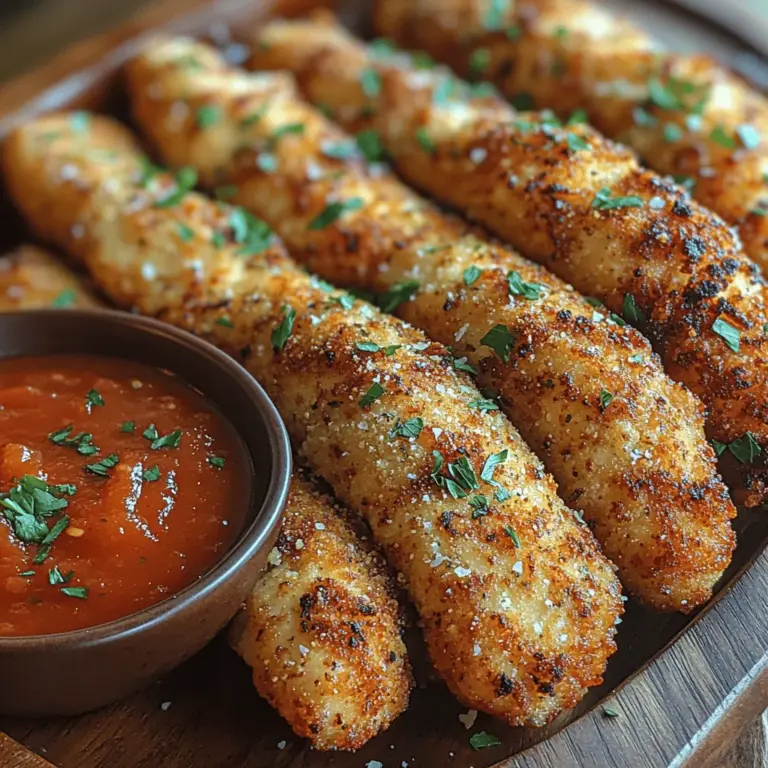
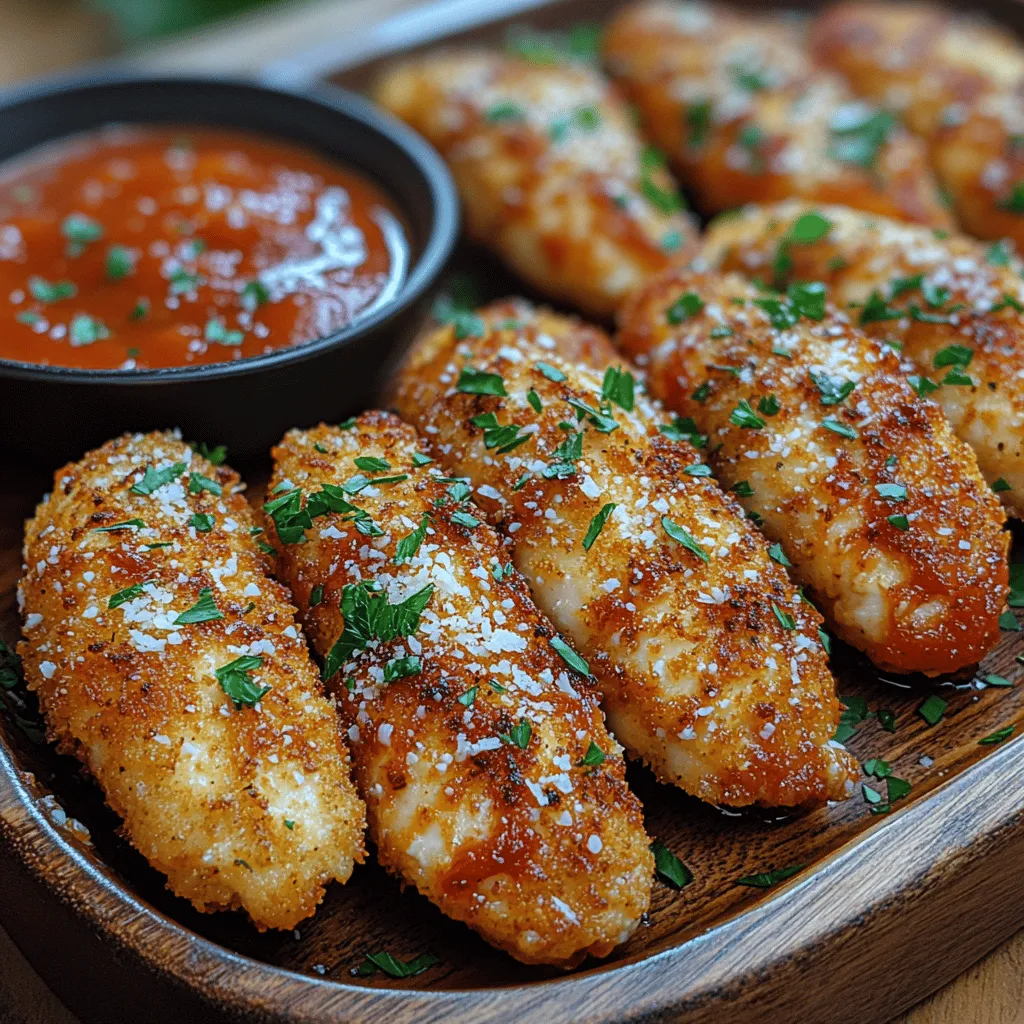
– Serve on a Wooden Board: Arrange the chicken fingers on a rustic wooden board for a charming, casual presentation. Add small bowls of marinara sauce for dipping.
– Garnish with Greens: Place a handful of fresh arugula or spinach on the plate for a pop of color and freshness.
– Use a Slate Plate: For a modern touch, serve on a slate plate. This adds elegance and makes the vibrant colors of the chicken and sauces stand out.
Pairing Suggestions: Ideal Sides to Complement the Dish
To create a well-rounded meal, consider pairing your chicken Parmesan fingers with these ideal sides:
– Garlic Bread: A classic pairing, garlic bread is a favorite that complements the flavors of the chicken.
– Pasta Salad: A light pasta salad with a vinaigrette dressing can provide a refreshing contrast to the crispy chicken.
– Steamed Vegetables: Broccoli, asparagus, or green beans add color and nutrition while balancing the heaviness of the fried chicken.
Salads, Pastas, or Vegetables that Enhance the Meal
Enhance your meal with these additional dishes:
– Caesar Salad: The creamy dressing and crisp romaine lettuce work wonderfully with the chicken.
– Spaghetti Marinara: A classic Italian combination, spaghetti topped with marinara sauce pairs beautifully with the chicken.
– Roasted Vegetables: Seasonal roasted veggies provide a nutritious and colorful addition to your plate.
Discussion on Garnishing with Fresh Parsley: Aesthetic and Flavor Benefits
Adding a sprinkle of fresh parsley not only enhances the visual appeal of your dish but also adds a burst of flavor. The mild, slightly peppery taste of parsley complements the richness of the chicken and cheese.
– Chopped or Whole Leaves: For a sophisticated presentation, use whole leaves or a light chop to sprinkle over the top just before serving.
– Flavor Contrast: Fresh herbs like parsley brighten up the dish and balance the heaviness of fried food, making every bite more enjoyable.
Nutritional Information
Breakdown of Nutritional Content per Serving
Here’s a general breakdown of the nutritional content for one serving (about 4 chicken fingers):
– Calories: 350
– Protein: 30g
– Fat: 20g
– Carbohydrates: 15g
– Fiber: 1g
– Sugar: 1g
Healthier Alternatives or Substitutions for Specific Ingredients
If you’re looking to make this dish a bit healthier, consider these substitutions:
– Baking Instead of Frying: Use an oven for a healthier option by baking the chicken fingers at 400°F (200°C) for 20-25 minutes, flipping halfway through.
– Whole Wheat Breadcrumbs: Swap regular breadcrumbs for whole wheat to increase fiber content.
– Low-Fat Cheese: Use part-skim mozzarella to cut down on fat without sacrificing flavor.
Suggestions for Gluten-Free or Low-Carb Variations
For those following gluten-free or low-carb diets, here are some variations:
– Gluten-Free Breadcrumbs: Use gluten-free panko or crushed almonds for a crispy coating.
– Almond Flour: Replace breadcrumbs with almond flour for a low-carb option that still provides crunch.
– Zucchini Noodles: Serve your chicken fingers over zucchini noodles instead of traditional pasta for a low-carb meal.
Conclusion
Crispy chicken Parmesan fingers are not just a meal; they’re an experience. With their golden, crunchy exterior and juicy, flavorful interior, they’re sure to delight anyone who takes a bite. This recipe is not only versatile but also perfect for gatherings, family dinners, or a cozy night in.
Encouraging friends and family to join in the cooking process can turn this dish into a memorable bonding activity. So, roll up your sleeves and try making these delicious chicken fingers at home. The joy of savoring homemade comfort food together is truly unmatched. Don’t be surprised if they become a regular request at your dinner table!