
Crispy Garlic Breadsticks Recipe
Introduction
Garlic breadsticks have earned their place as a beloved appetizer and side dish in many households around the world. With their crispy exterior and soft, chewy interior, they are often the perfect accompaniment to pasta dishes, soups, or even as a standalone snack. The allure of these breadsticks lies not only in their delightful flavor but also in their aroma, which fills the kitchen with a warm, inviting scent that is hard to resist.
While store-bought options certainly exist, nothing compares to the experience of indulging in homemade garlic breadsticks. When made from scratch, you have the freedom to customize the flavors, control the freshness of the ingredients, and create a product that is truly your own. Homemade breadsticks are not only fresher but also allow you to showcase your culinary skills in a way that impresses family and friends. The satisfaction of pulling a tray of golden, crispy garlic breadsticks from the oven is unmatched.
This recipe for crispy garlic breadsticks is designed to be both easy to follow and rewarding, making it an ideal addition to any meal. Whether you are preparing a family dinner, hosting a gathering, or simply craving a delicious snack, these breadsticks will elevate your dining experience. Let’s dive into the ingredients that make this recipe shine and the steps needed to create these delectable treats.
Understanding the Ingredients
The magic of crispy garlic breadsticks lies in the quality and combination of ingredients used in the recipe. Each component plays a crucial role in achieving the perfect texture and flavor profile.
– All-Purpose Flour: As the foundation of the breadsticks, all-purpose flour provides the necessary structure. It contains the right amount of protein to develop gluten, which contributes to the chewy texture of the final product.
– Active Dry Yeast: This ingredient is essential for leavening the dough. Yeast ferments and produces carbon dioxide, causing the dough to rise and develop a light, airy texture. It is important to ensure that the yeast is fresh and properly activated to achieve the best results.
– Warm Water: The warmth of the water is vital for activating the yeast. It should be just above body temperature—around 110°F (43°C)—to ensure the yeast thrives without being killed by excessive heat.
– Sugar: Sugar serves a dual purpose in this recipe. It not only aids in activating the yeast but also enhances the flavor of the breadsticks. A hint of sweetness balances the savory elements beautifully.
– Salt: While salt is often viewed as a simple seasoning, it plays a significant role in bread-making. It enhances the overall taste and strengthens the gluten structure, resulting in a better texture.
– Olive Oil: This ingredient adds moisture and richness to the breadsticks. It also helps create a slightly crispy crust while keeping the interior soft.
– Unsalted Butter: Used in the garlic mixture, unsalted butter contributes a rich flavor and smooth texture. Its creaminess complements the aromatic garlic and herbs, enriching the overall taste.
– Garlic and Italian Herbs: Fresh garlic is a key player in this recipe, giving the breadsticks their signature flavor. Paired with Italian herbs like oregano and basil, these ingredients create an aromatic and flavorful experience.
– Black Pepper: A subtle addition, black pepper adds depth and a slight kick, balancing the richness of the butter and the savory notes of garlic.
– Parmesan Cheese: This optional ingredient offers a savory finish to the breadsticks. When sprinkled on top, it creates a delightful crust that adds both flavor and texture.
– Parsley: Serving as an optional garnish, fresh parsley adds a pop of color and a hint of freshness to the final presentation. It enhances the visual appeal and provides a contrast to the rich flavors of the garlic and cheese.
Step-by-Step Instructions for Crispy Garlic Breadsticks
Now that we’ve explored the essential ingredients, let’s delve into the step-by-step process for making crispy garlic breadsticks. This guide will ensure you achieve the perfect batch, with each step building on the last.
1. Activating the Yeast: Begin by combining warm water and sugar in a small bowl. Sprinkle the active dry yeast over the top and let it sit for about 5-10 minutes. The mixture should become frothy, indicating that the yeast is active and ready to use. If it doesn’t foam, it’s best to start over with fresh yeast and water.
2. Making the Dough: In a large mixing bowl, combine the all-purpose flour and salt. Once the yeast mixture is ready, pour it into the flour along with olive oil. Mix until the ingredients come together into a cohesive dough. The dough should not be too sticky; if it is, gradually add more flour until you achieve the right consistency.
3. Kneading: Transfer the dough onto a lightly floured surface. Knead the dough for about 8-10 minutes, or until it becomes smooth and elastic. This step is crucial for developing gluten, which gives the breadsticks their desirable texture. If the dough feels too tacky, sprinkle a little more flour as needed.
4. First Rise: Place the kneaded dough in a lightly greased bowl, covering it with a clean kitchen towel or plastic wrap. Let it rise in a warm, draft-free area for about 1 to 1.5 hours, or until it has doubled in size. This rising period allows the yeast to work its magic, creating a light and airy dough.
5. Preparing the Garlic Mixture: While the dough is rising, prepare the garlic mixture. Melt unsalted butter in a small saucepan over low heat. Add minced garlic and Italian herbs, stirring gently to infuse the flavors. Be cautious not to let the garlic burn, as this can lead to a bitter taste. Remove from heat and set aside to cool slightly.
6. Shaping the Breadsticks: Once the dough has risen, punch it down gently to release the air. Turn it out onto a floured surface and divide it into equal portions, depending on the size of breadsticks you desire. Roll each portion into a long strip, approximately 1 inch wide. You can twist the dough or create fun shapes to add visual interest to your breadsticks.
With these initial steps, you have laid the foundation for deliciously crispy garlic breadsticks. In the following sections, we will cover the final steps of baking and garnishing to complete this delightful recipe. Stay tuned for the continuation, where we will explore how to achieve that perfectly crispy texture and rich flavor that we all love in garlic breadsticks.
Second Rise: The Significance of Allowing the Dough to Rest Before Baking
After kneading your dough, the second rise is a crucial step that should not be overlooked. This period of rest allows the yeast to continue its fermentation process, which results in a lighter and fluffier texture in the finished breadsticks. During this time, the dough’s flavors will deepen and develop complexity. Generally, you can expect to let the dough rise for about 30 minutes to 1 hour, or until it has doubled in size.
To create the ideal environment for rising, cover the bowl with a damp cloth or plastic wrap. This prevents the dough from drying out and helps maintain moisture, which is essential for the yeast activity. A warm, draft-free area, such as an oven with the light on or a slightly heated kitchen, is perfect for this purpose.
Preheating the Oven: Importance of a Properly Heated Oven for Crispiness
While your dough is rising, take the time to prepare your oven. Preheating is an essential step that significantly affects the outcome of your garlic breadsticks. An adequately heated oven ensures that the breadsticks bake evenly and develop that coveted crispy crust.
Set your oven to 425°F (220°C) and allow it to preheat for at least 20 minutes before placing the breadsticks inside. This will provide a consistent temperature throughout the baking process, allowing the outside to become golden brown while the inside remains soft and chewy. If you have a baking stone, place it in the oven during this time for even better results, as it will help distribute heat evenly.
Baking: Timing and Visual Cues for Perfect Doneness
Now that your dough has risen and your oven is preheated, it’s time to bake your garlic breadsticks. Carefully transfer the risen dough onto a lightly floured surface and divide it into equal pieces, typically about 12 to 16, depending on your desired size.
Roll each piece into a long, thin stick—about 6 to 8 inches in length. Place the sticks on a parchment-lined baking sheet, ensuring they have enough space in between for expansion. Brush each stick generously with melted butter infused with minced garlic and herbs, ensuring a flavorful crust.
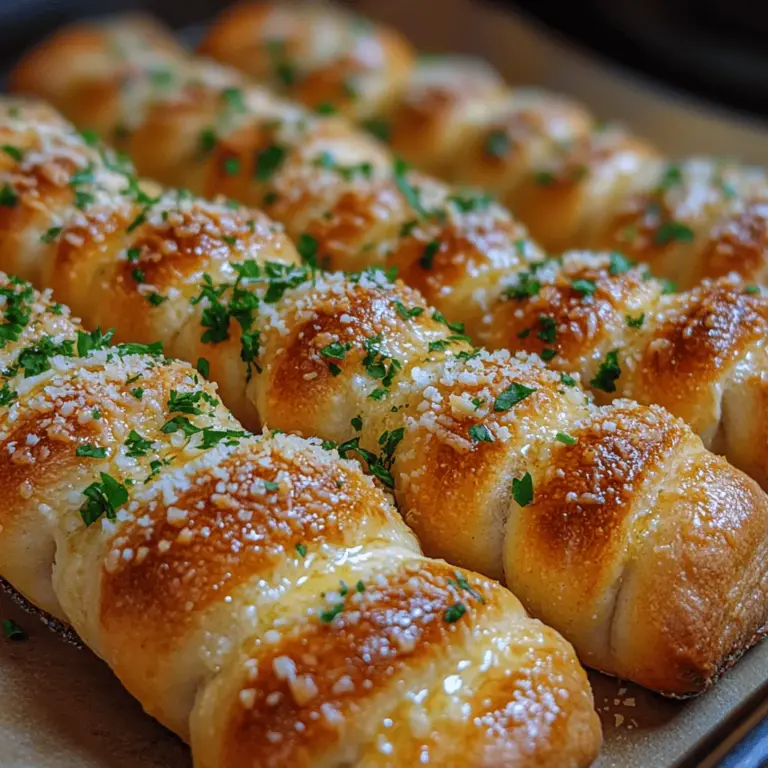
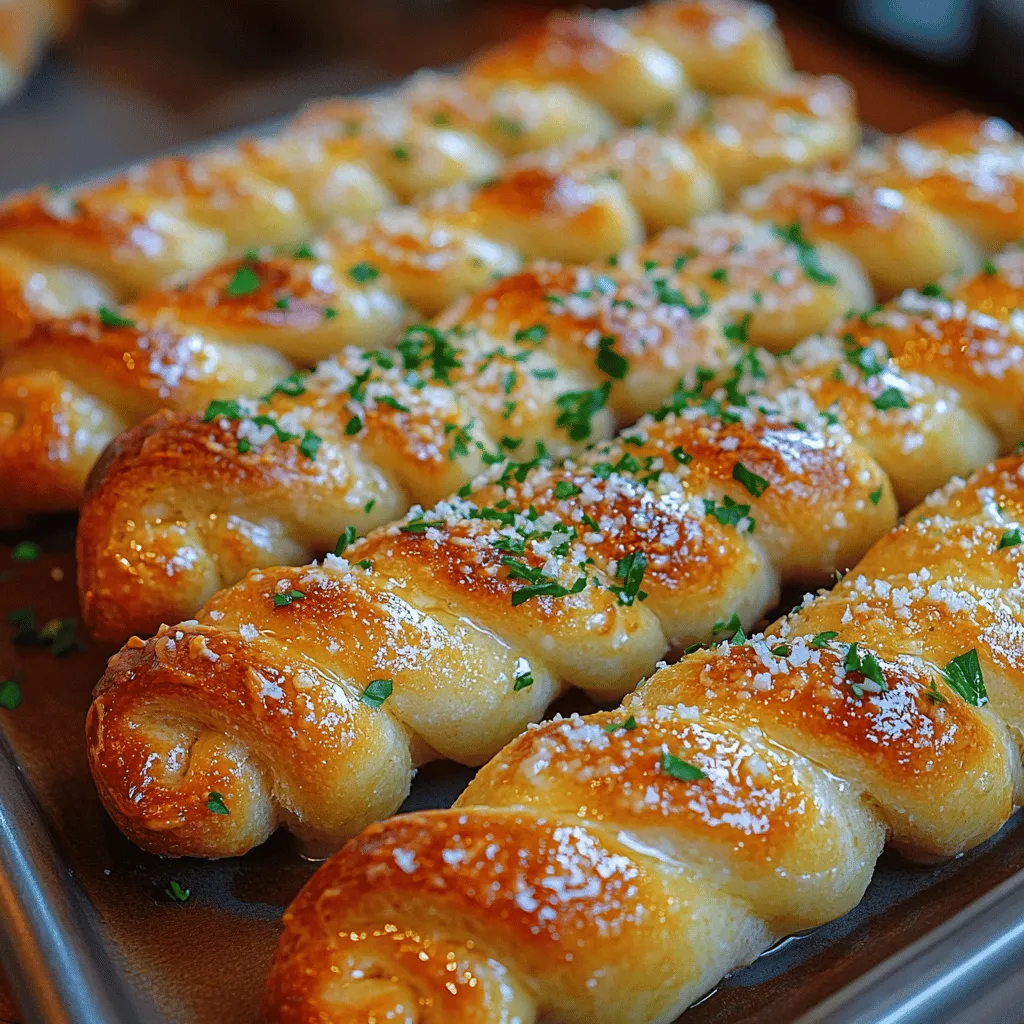
Bake the breadsticks in the preheated oven for 12 to 15 minutes. Keep an eye on them as they bake; they should turn a beautiful golden brown color and produce a delightful aroma that fills your kitchen. A quick visual cue is to look for a slight puffing up of the dough and that golden hue, indicating they are ready.
Garnishing and Serving: Presentation Tips for an Appetizing Dish
Once your garlic breadsticks are baked to perfection, it’s time to take them out of the oven and let them cool for a few minutes. For an enticing finish, consider garnishing them with a sprinkle of freshly chopped parsley or a dusting of grated Parmesan cheese. This not only enhances the appearance but also adds a pop of flavor.
Serving your garlic breadsticks warm is key to enjoying their delightful texture and taste. Arrange them neatly on a serving platter, and for an added touch, pair them with a small bowl of dipping sauce. Whether you choose marinara, garlic butter, or an herbed olive oil, having a dip on the side elevates the dining experience and invites guests to indulge.
The Science of Breadstick Making
Understanding the science behind bread-making can enhance your culinary skills and appreciation for this delightful dish.
Yeast Fermentation and Its Impact on Flavor and Texture
Yeast plays a pivotal role in creating the airy structure of breadsticks. When yeast ferments, it converts sugars into carbon dioxide and alcohol, which causes the dough to rise. This fermentation process not only leavens the bread but also contributes to its flavor profile. The longer the dough ferments, the more complex the flavors become, which is why allowing adequate rising time is crucial.
Role of Gluten Development in Achieving the Desired Chewiness
Gluten, a protein in wheat flour, provides the structure and chewiness in bread. When kneading the dough, you activate gluten strands, which create a network that traps the gas produced by the yeast. This process gives bread its characteristic texture. The goal is to develop enough gluten to achieve that perfect chewiness without making the dough too tough.
Importance of Fat in Creating a Tender Crumb
Lastly, fat plays a critical role in the texture of your garlic breadsticks. Incorporating melted butter not only adds flavor but also helps create a tender crumb by coating the gluten strands, preventing them from becoming overly elastic. This results in a softer, more enjoyable texture that contrasts beautifully with the crispy exterior.
Pairing Suggestions
Pairing your crispy garlic breadsticks with complementary dips and sides can elevate your meal. Here are some delicious options:
Marinara Sauce for a Classic Italian Touch
Marinara sauce is a classic pairing for garlic breadsticks. Its rich tomato flavor, combined with herbs like basil and oregano, provides a delightful contrast to the buttery, garlicky notes of the breadsticks. Serve warm for the best experience.
Olive Oil Infused with Herbs for a Mediterranean Flair
For a lighter option, consider serving your garlic breadsticks with a bowl of high-quality olive oil infused with herbs. A mix of rosemary, thyme, and a hint of chili flakes can create a fragrant dip that complements the flavors of the breadsticks beautifully.
Cheese Dips and Spreads for an Indulgent Experience
Cheese lovers will appreciate a creamy cheese dip or spread alongside their breadsticks. Options like a warm three-cheese blend or a tangy goat cheese spread can enhance the richness of the garlic flavor while providing a comforting indulgence.
Creative Variations of Garlic Breadsticks
While the classic garlic breadstick recipe is delightful on its own, you can customize it for a unique twist. Here are some creative variations to consider:
Adding Cheese to the Dough for Extra Flavor
Incorporating shredded cheese directly into the dough can elevate the flavor profile significantly. Cheeses like mozzarella or cheddar will create a cheesy interior, adding an extra layer of satisfaction as you bite into the warm breadsticks.
Experimenting with Different Herbs and Spices
Don’t hesitate to mix up the herbs in your butter mixture. Basil, oregano, or even a pinch of cayenne pepper can introduce new flavors that pair beautifully with the garlic. Try combining fresh herbs with dried spices to create a personalized blend.
Incorporating Roasted Garlic or Sun-Dried Tomatoes
For a gourmet touch, consider incorporating roasted garlic into the dough or sprinkling chopped sun-dried tomatoes on top before baking. These additions will enhance the overall flavor and make your garlic breadsticks stand out.
Storage and Reheating Tips
To maintain the freshness of your leftover garlic breadsticks, store them properly. Allow them to cool completely, then place them in an airtight container. They can be kept at room temperature for up to two days or in the refrigerator for up to a week.
Techniques for Reheating to Restore Crispiness
When you’re ready to enjoy your leftovers, reheating properly is essential to restore their crispy texture. The best method is to preheat your oven to 350°F (175°C) and bake the breadsticks for about 5 to 10 minutes. Alternatively, you can use a toaster oven for a quicker reheating option.
Conclusion
Making crispy garlic breadsticks is not just about following a recipe—it’s about embracing the joy of homemade food and the versatility it brings to your dining table. From the science of yeast fermentation to the art of pairing flavors, each step in the process contributes to creating a delightful experience. Whether served as an appetizer, a side dish, or a snack, these breadsticks are sure to impress.
Encourage your culinary creativity by trying the variations and serving suggestions, and don’t forget to share the joy of your homemade garlic breadsticks with friends and family. Enjoy the process, savor the flavors, and celebrate the simple pleasure of baking.
