Introduction
Chicken tenders are a beloved dish, universally adored by both children and adults alike. Their tender texture and versatility make them a staple in many households. Whether enjoyed as a quick snack, a party appetizer, or a family dinner, chicken tenders can easily be tailored to suit a variety of tastes. However, traditional frying methods often leave us with greasy and calorie-laden results. That’s where the beauty of oven-baking comes into play. By baking instead of frying, we can achieve a deliciously crispy exterior while significantly cutting down on unhealthy fats.
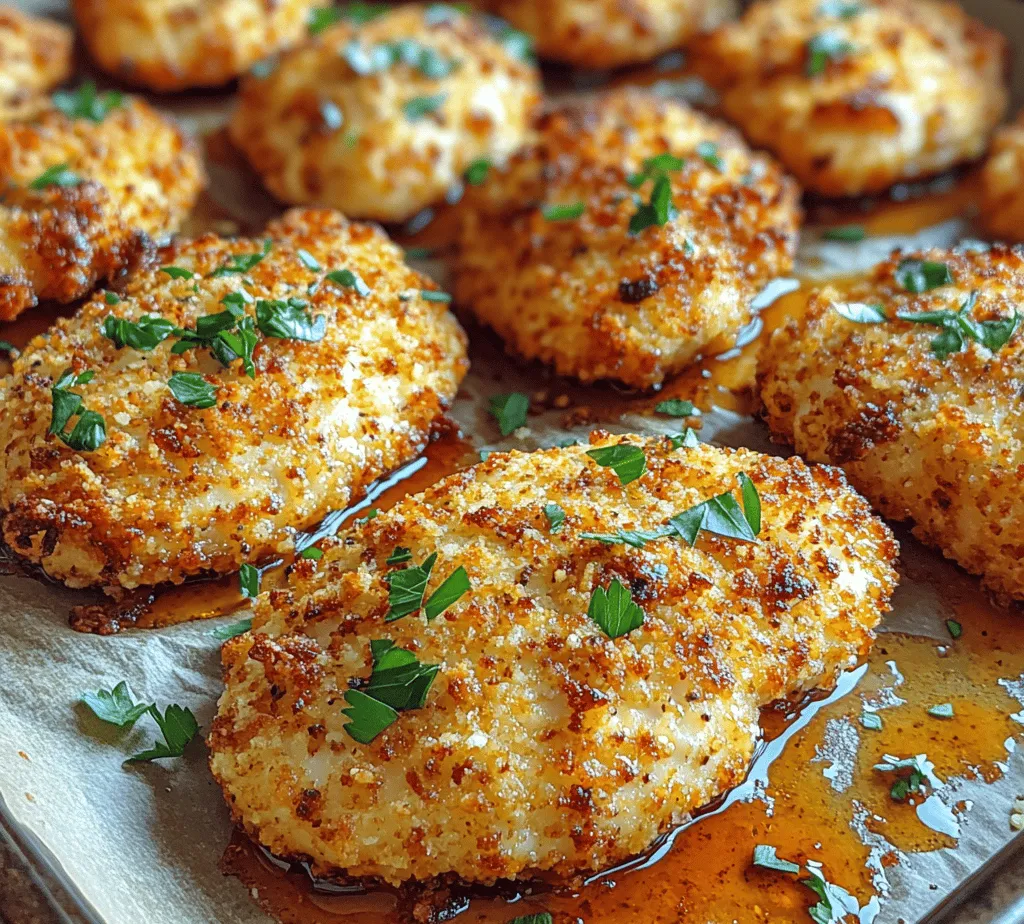
This oven-baked crispy Parmesan chicken tenders recipe takes the beloved classic to an entirely new level. With the addition of Parmesan cheese, these tenders gain an irresistible flavor and crunch that elevates them from simple to spectacular. Perfect for a weeknight meal or a fun gathering, these tenders are not only healthier but also incredibly satisfying. Let’s dive deeper into what makes chicken tenders so special, the nutritional benefits they offer, and the ingredients that contribute to this mouthwatering recipe.
Understanding Chicken Tenders
So, what exactly are chicken tenders? Often referred to as chicken strips or chicken fingers, these juicy pieces of meat are actually derived from the tenderloin of the chicken breast. This part of the chicken is known for its tenderness and mild flavor, making it the ideal choice for a dish that is meant to be both juicy and easy to eat.
When it comes to nutritional benefits, chicken is an excellent source of lean protein, which is essential for muscle growth, repair, and overall health. A serving of chicken tenders provides not only protein but also essential vitamins and minerals such as B vitamins, phosphorus, and selenium. Choosing chicken as your protein source can support a balanced diet, especially when prepared in a healthier manner like baking.
Chicken tenders can be prepared using a variety of cooking methods. The most common methods include frying, baking, and grilling. Frying tends to produce a crispy exterior and juicy interior but often results in high-calorie content due to the oil used. Baking, on the other hand, allows for a healthier alternative without sacrificing taste or texture. Grilling is another option that adds a smoky flavor while keeping the dish light. In this recipe, we’ll focus on the oven-baking method, which ensures that our chicken tenders remain crispy while using minimal oil.
Ingredients Breakdown
Now that we understand the appeal of chicken tenders, let’s explore the ingredients that make this oven-baked crispy Parmesan chicken tenders recipe a standout.
Chicken Tenders
First and foremost, we have the chicken tenders themselves. Sourced from the tenderloin area of the chicken breast, these tenders are moist and tender by nature. When purchasing chicken tenders, look for those that are fresh and free from antibiotics or hormones, if possible. Not only do chicken tenders provide a great source of protein, but they are also easy to cook and can be seasoned in countless ways.
All-Purpose Flour
Next, we have all-purpose flour, which plays a crucial role in the breading process. The flour acts as the foundation for the coating, helping it adhere to the chicken. It also adds a slight crunch to the final product. When selecting flour, opt for unbleached all-purpose flour, which is less processed and retains more nutrients.
Eggs
Eggs are essential in this recipe, serving as a binding agent that helps the breading stick to the chicken. They also add moisture, ensuring that the tenders remain juicy during the baking process. For those with dietary restrictions, consider using a flaxseed meal or a commercial egg replacer as a substitute.
Breadcrumbs
Breadcrumbs are pivotal in achieving the desired crunchiness of the chicken tenders. In this recipe, we recommend using panko breadcrumbs over traditional breadcrumbs. Panko, which originates from Japan, is lighter and flakier, resulting in a crispier texture. If you prefer, you can also make your own breadcrumbs using stale bread for a more personalized touch.
Parmesan Cheese
The star of our recipe is undoubtedly the Parmesan cheese. This hard cheese contributes not only a rich, nutty flavor but also a delightful crunch to the breading. Parmesan is also a good source of calcium and protein, adding nutritional value to our dish. For the best results, use freshly grated Parmesan cheese instead of pre-packaged options, which often contain anti-caking agents.
Spices
To elevate the flavor profile of our chicken tenders, we will incorporate a blend of spices including garlic powder, onion powder, and paprika. Garlic powder adds a robust flavor, while onion powder contributes a subtle sweetness. Paprika can provide a hint of smokiness and color, making the tenders visually appealing as well.
Salt and Black Pepper
Seasoning is key in any recipe, and this one is no exception. A generous sprinkle of salt and freshly ground black pepper enhances the overall flavor of the chicken tenders. It is crucial to season each layer of the recipe to ensure every bite is packed with flavor.
Olive Oil Versus Cooking Spray
For a healthier option, we will use olive oil to lightly coat our chicken tenders before baking. Olive oil not only helps the breading crisp up in the oven but also provides healthy fats that are beneficial for heart health. Alternatively, a cooking spray can be used for a lower-calorie option, though it may not yield the same depth of flavor as olive oil.
Fresh Parsley
Lastly, we’ll add fresh parsley as a garnish. Not only does parsley brighten up the dish visually, but it also adds a fresh flavor and is rich in vitamins A, C, and K. A sprinkle of fresh parsley before serving will enhance the overall presentation of your crispy Parmesan chicken tenders.
Preparation Steps
Now that we have discussed the ingredients, let’s move on to the preparation steps for this delicious oven-baked crispy Parmesan chicken tenders recipe.
1. Preheat the Oven: Begin by preheating your oven to 425°F (220°C). A high temperature is essential for achieving a crispy texture in the absence of frying.
2. Prepare the Baking Sheet: Line a baking sheet with parchment paper or lightly grease it with olive oil to prevent the tenders from sticking.
3. Set Up the Breading Station: Create a breading station by setting out three shallow bowls. In the first bowl, add the all-purpose flour and season it with salt and pepper. In the second bowl, crack the eggs and whisk them until smooth. In the third bowl, combine the panko breadcrumbs, grated Parmesan cheese, garlic powder, onion powder, paprika, and a pinch of salt and pepper. Mix well to ensure the spices are evenly distributed.
4. Coat the Chicken Tenders: Take each chicken tender and first coat it in the seasoned flour, shaking off any excess. Next, dip it into the beaten eggs, allowing any excess egg to drip off. Finally, roll the tender in the breadcrumb mixture, pressing gently to ensure the breadcrumbs adhere well. Place the coated chicken tenders on the prepared baking sheet, ensuring they are spaced evenly apart to promote even cooking.
5. Drizzle with Olive Oil: Once all the chicken tenders are coated, lightly drizzle them with olive oil or spray them with cooking spray. This will help the breading reach that golden, crispy perfection in the oven.
Following these preparation steps will set you on the right path to creating oven-baked crispy Parmesan chicken tenders that are not only healthier than their fried counterparts but also packed with flavor and crunch.
As we continue with this recipe, we will explore the baking process, serving suggestions, and tips for achieving the best possible results. Stay tuned for more delicious insights into making these irresistible chicken tenders!
Detailed Step-by-Step Instructions for Preparing the Chicken Tenders
1. Preheat the Oven
Start by preheating your oven to 400°F (200°C). Preheating is crucial as it ensures that the chicken tenders cook evenly, achieving that perfect crispy exterior while keeping the meat moist inside. A hot oven will help the breading to set quickly, giving you a delightful crunch.
2. Prepare the Chicken
For this recipe, you’ll need boneless, skinless chicken breasts cut into tenders. If you prefer, you can buy pre-cut chicken tenders. Pat the chicken pieces dry with paper towels to remove excess moisture; this step helps the breading adhere better.
3. Set Up a Breading Station
Efficiently preparing your breading station will streamline the cooking process. Set out three shallow dishes:
– First Dish: Place all-purpose flour seasoned with salt and pepper.
– Second Dish: Beat a couple of eggs in another dish. You can add a splash of water or milk to make the egg wash more fluid.
– Third Dish: Combine breadcrumbs with grated Parmesan cheese, garlic powder, and any additional seasonings you prefer in the third dish.
4. Breading the Chicken Tenders
To ensure the breading adheres to the chicken, follow this sequence:
– Step 1: Dredge each chicken tender in the flour mixture, shaking off any excess.
– Step 2: Dip the floured chicken in the egg wash, allowing any excess to drip off.
– Step 3: Finally, coat the chicken in the breadcrumb mixture, pressing gently to ensure the breading sticks well.
5. Arrange on a Baking Sheet
Line a baking sheet with parchment paper or lightly grease it with cooking spray. Place the coated chicken tenders on the sheet, ensuring they are spaced apart to allow air circulation, which promotes even cooking.
Techniques for Achieving a Golden-Brown Finish
To achieve that irresistible golden-brown finish, consider the following tips:
– Use Panko Breadcrumbs: For an extra crunch, use panko breadcrumbs instead of regular breadcrumbs. They create a lighter and crispier texture.
– Spray with Oil: Lightly spray the breaded chicken tenders with cooking spray or drizzle with olive oil before baking. This adds a beautiful golden color and enhances crispiness.
– Oven Positioning: Place the baking sheet on the middle rack of the oven to ensure even heat distribution.
Cooking Process
1. Baking the Chicken Tenders
Once your oven is preheated, place the baking sheet in the oven. Bake the chicken tenders for about 15-20 minutes, flipping them halfway through to ensure an even cook on both sides. This step is vital; it allows both sides to crisp up rather than just one, resulting in a uniform texture.
2. Monitoring Internal Temperature
To ensure your chicken tenders are safe to eat, use a meat thermometer to check the internal temperature. The USDA recommends that chicken reaches an internal temperature of 165°F (74°C). Insert the thermometer into the thickest part of the tender to get an accurate reading.
3. Visual Indicators of Doneness
Apart from checking the temperature, look for visual cues to indicate that your chicken tenders are ready. The breading should be a deep golden brown, and the chicken should be opaque with no pink juices running when cut.
Serving Suggestions
1. Accompanying Sauces
Enhance your chicken tenders with a variety of delicious dipping sauces. Consider serving them with:
– Honey Mustard: A sweet and tangy blend that pairs perfectly with the savory chicken.
– Ranch Dressing: Creamy and herby, ranch is a classic accompaniment.
– BBQ Sauce: For those who enjoy a smoky flavor, BBQ sauce adds a delightful kick.
2. Side Dishes
Pair your baked chicken tenders with satisfying side dishes. Here are some ideas:
– French Fries: A classic combination, crispy fries are always a hit.
– Fresh Salads: A light salad with mixed greens, cherry tomatoes, and a vinaigrette complements the richness of the chicken.
– Steamed Vegetables: Broccoli, green beans, or carrots provide a colorful and healthy contrast.
3. Creative Serving Ideas
Adapt your presentation based on the occasion. For family dinners, serve the chicken tenders on a large platter with dipping sauces in small bowls. For parties, consider skewering the tenders on toothpicks for easy serving. For kid-friendly meals, arrange the chicken on a fun plate with colorful veggies and favorite sauces.
Nutritional Information
1. Caloric Breakdown
Each serving of these oven-baked crispy Parmesan chicken tenders contains approximately 320 calories. This is a healthier option than traditional fried chicken tenders, which can contain over 500 calories per serving due to the oil absorption.
2. Baked vs. Fried
Baking the chicken tenders instead of frying significantly reduces the amount of fat and calories. Baked options maintain a crispy texture without the added grease, making them a healthier choice for families looking to enjoy comfort food without the guilt.
3. Portion Control and Moderation
While these chicken tenders are a healthier option, moderation is key. Pair them with a variety of colorful vegetables and whole grains to create a balanced meal. Encourage portion control by serving on smaller plates or offering a variety of sides to reduce the temptation of overindulging.
Conclusion
In summary, these oven-baked crispy Parmesan chicken tenders are not only healthier but also delicious and easy to prepare. The process allows you to enjoy the comforting flavors of chicken tenders without the added calories and fat from frying. Plus, you can easily customize the recipe with different seasonings or dipping sauces to suit your taste.
We encourage you to try this recipe and explore your own variations by adding spices or experimenting with different coatings. The joy of homemade comfort food lies in its flexibility and the way it brings families together around the dinner table.
With your newfound skills in preparing these chicken tenders, you’ll not only impress your family and friends but also create lasting memories during gatherings. So, roll up your sleeves, gather your ingredients, and enjoy the satisfaction of serving a wholesome, homemade meal that everyone will love.