
If you’re yearning for a taste of the tropics, look no further than the Tropical Delight Hawaiian Cheesecake Danish. This exquisite pastry is a delightful fusion of Hawaiian flavors and classic cheesecake, enveloped in a buttery, flaky Danish dough. With its vibrant presentation and rich, creamy filling, it’s a perfect treat for any occasion, whether you’re hosting a brunch, celebrating a special event, or simply indulging in a personal moment of culinary bliss.
Inspired by the lush landscapes and vibrant culinary traditions of Hawaii, this recipe captures the essence of tropical islands with every bite. The combination of sweet pineapple, creamy cheesecake, and the subtle hint of coconut creates a symphony of flavors that transport you to sandy beaches and swaying palm trees. The visual appeal of the Danish, adorned with a glossy pineapple glaze, makes it not only delicious but also a feast for the eyes.
In this article, you will find a comprehensive, step-by-step guide to creating your own Tropical Delight Hawaiian Cheesecake Danish at home. We will delve into the ingredients that make this recipe truly special, explore the cultural significance behind it, and provide you with the essential steps to prepare this tropical treat. Get ready to dive into the world of flavors and textures that this delightful Danish has to offer!
Understanding the Tropical Delight Hawaiian Cheesecake Danish
What sets the Tropical Delight Hawaiian Cheesecake Danish apart from other pastries is its unique blend of flavors and textures. The Danish dough itself is a buttery, flaky masterpiece that serves as the perfect vessel for the luscious cheesecake filling. This combination not only tantalizes your taste buds but also provides a satisfying contrast between the crispy exterior and the creamy interior.
The cultural significance of this recipe lies in its homage to Hawaiian cuisine, which is renowned for its fresh ingredients and vibrant flavors. Traditional Hawaiian dishes often feature tropical fruits, such as pineapple and coconut, which are not only delicious but also symbolize the abundant nature of the islands. By incorporating these elements into the Danish, we celebrate the rich culinary heritage of Hawaii while creating a dessert that can be enjoyed anywhere in the world.
One of the greatest benefits of making this recipe at home is the freshness it brings. Store-bought pastries may lack the quality and flavor found in homemade versions. By preparing the Tropical Delight Hawaiian Cheesecake Danish yourself, you have complete control over the ingredients, allowing for customization to suit your taste preferences. Whether you prefer extra pineapple or a hint of lime zest, the possibilities are endless, making this recipe truly your own.
Exploring the Ingredients
Creating the Tropical Delight Hawaiian Cheesecake Danish begins with understanding the key ingredients that contribute to its taste, texture, and overall allure. Let’s break down the components of both the Danish dough and the cheesecake filling, as well as the pineapple glaze that adds the finishing touch.
Danish Dough Ingredients
1. All-Purpose Flour: This versatile ingredient forms the foundation of the Danish dough. It provides the necessary structure and texture, ensuring that the pastry has the right balance of flakiness and chewiness.
2. Sugar: Sugar plays a dual role in this recipe. Not only does it add sweetness, but it also aids in browning the dough during baking, resulting in a beautifully golden crust.
3. Active Dry Yeast: Yeast is crucial for leavening the dough, allowing it to rise and creating the light, airy texture that is characteristic of a Danish pastry.
4. Salt: While it may seem like a minor ingredient, salt enhances the overall flavor of the dough, balancing the sweetness and elevating the taste.
5. Unsalted Butter: Butter is the star ingredient that contributes to the richness and flakiness of the dough. Using unsalted butter allows you to control the sodium levels and focus on the buttery flavor.
6. Milk: The warmth of the milk is essential for activating the yeast, ensuring that the dough rises properly. It also adds moisture, contributing to the overall tenderness of the pastry.
7. Egg: Eggs serve multiple purposes in the Danish dough. They act as a binding agent, helping to hold the ingredients together, while also enriching the dough with flavor and color.
Cheesecake Filling Ingredients
1. Cream Cheese: The primary ingredient in the cheesecake filling, cream cheese provides the rich, creamy texture and tangy flavor that we associate with classic cheesecake.
2. Granulated Sugar: Sugar balances the natural tanginess of the cream cheese, resulting in a sweet and creamy filling that perfectly complements the tropical flavors.
3. Vanilla Extract: A splash of vanilla extract enhances the overall flavor profile of the cheesecake, adding depth and a hint of warmth.
4. Crushed Pineapple: This is where the tropical essence comes to life. Crushed pineapple adds moisture, sweetness, and a burst of fruity flavor that pairs beautifully with the creamy filling.
5. Shredded Coconut: For an authentic Hawaiian touch, shredded coconut brings both texture and flavor to the cheesecake filling, evoking the essence of island life.
Pineapple Glaze Ingredients
1. Pineapple Juice: The base of the glaze, pineapple juice infuses the glaze with vibrant flavor. It ties the entire dessert together and enhances the tropical theme.
2. Cornstarch: Acting as a thickening agent, cornstarch helps to create a smooth and glossy glaze that adheres perfectly to the Danish.
3. Sugar: A touch of sugar is added to balance the tartness of the pineapple juice, ensuring that the glaze is sweet yet refreshing.
Garnish Options
To elevate your Tropical Delight Hawaiian Cheesecake Danish further, consider adding garnishes such as fresh pineapple slices, toasted coconut flakes, or a sprinkle of chopped macadamia nuts. These additions not only enhance the presentation but also contribute additional layers of flavor and texture.
Step-by-Step Preparation of the Tropical Delight Hawaiian Cheesecake Danish
Now that we’ve explored the delightful ingredients that make up our Tropical Delight Hawaiian Cheesecake Danish, it’s time to dive into the step-by-step preparation process. This detailed guide will walk you through each phase of creating this delectable pastry, ensuring you achieve the perfect balance of flavors and textures.
1. Prepare the Danish Dough:
– Start by combining warm milk and active dry yeast in a bowl. Allow the mixture to sit for about 5 minutes until it becomes frothy, signaling that the yeast is activated.
– In a large mixing bowl, combine the all-purpose flour, sugar, and salt. Create a well in the center and add the yeast mixture, melted unsalted butter, and the egg. Mix until a dough forms.
– Knead the dough on a floured surface for about 5 minutes until it becomes smooth and elastic. Place the dough in a greased bowl, cover it with a clean kitchen towel, and let it rise in a warm place for about 1 hour or until it doubles in size.
2. Make the Cheesecake Filling:
– While the dough is rising, prepare the cheesecake filling by beating the cream cheese in a mixing bowl until smooth and creamy.
– Gradually add the granulated sugar, mixing until well combined. Add the vanilla extract, crushed pineapple (drained), and shredded coconut. Mix until all ingredients are evenly incorporated.
3. Assemble the Danish:
– Once the dough has risen, punch it down to release any air bubbles. Roll it out on a floured surface into a rectangle about 1/4 inch thick.
– Cut the dough into squares or rectangles, depending on your desired size. Place a generous spoonful of the cheesecake filling in the center of each piece of dough. Fold the corners of the dough over the filling to create a pocket, pinching the edges to seal.
– Place the assembled Danish on a baking sheet lined with parchment paper. Cover them with a towel and let them rise for another 30 minutes.
4. Prepare the Pineapple Glaze:
– In a small saucepan, combine pineapple juice, sugar, and cornstarch over medium heat. Stir continuously until the mixture thickens into a glossy glaze. Remove from heat and let it cool slightly.
5. Bake the Danish:
– Preheat your oven to 375°F (190°C). Bake the Danish for about 20-25 minutes or until golden brown. Once baked, allow them to cool slightly before brushing the warm pineapple glaze over the top.
With these steps completed, you’ll have a stunning batch of Tropical Delight Hawaiian Cheesecake Danish ready to impress your family and friends. The combination of the flaky pastry, creamy filling, and sweet glaze makes for an exquisite tropical dessert that is sure to be a hit at any gathering.
Stay tuned as we explore more tips for perfecting your Danish and creative serving suggestions to make your tropical treat stand out even more!

Detailed Instructions for Preparing the Danish Dough
To create the perfect Tropical Delight Hawaiian Cheesecake Danish, we start with the Danish dough. This rich, flaky pastry serves as the base for the delightful cheesecake filling and fruity glaze. Follow these detailed steps to ensure that your dough is prepared to perfection.
1. Mixing the Ingredients: In a large mixing bowl, combine 4 cups of all-purpose flour, 1/4 cup of granulated sugar, and 1 teaspoon of salt. Mix these dry ingredients together until they are well blended. In a separate bowl, mix 1 cup of warm milk (about 110°F), 1 packet (2 1/4 teaspoons) of active dry yeast, and 1/4 cup of melted unsalted butter. Let this mixture sit for 5-10 minutes until it becomes frothy, indicating that the yeast is active.
2. Incorporating the Ingredients: Once the yeast mixture is ready, pour it into the bowl with the dry ingredients. Add 1 large egg and mix everything until combined. Use a wooden spoon or your hands to bring the dough together.
3. Kneading the Dough: Transfer the dough onto a lightly floured surface. Knead the dough for about 8-10 minutes until it becomes smooth and elastic. Proper kneading is essential as it develops the gluten, which gives the Danish its characteristic texture.
4. First Rise: Place the kneaded dough into a greased bowl, cover it with a damp cloth or plastic wrap, and let it rise in a warm place for about 1-2 hours or until it has doubled in size. The warmth encourages the yeast to activate, resulting in a light and airy pastry.
Tips for Ensuring Dough Rises Effectively
– Warm Environment: Yeast thrives in warmth, so find a cozy spot in your kitchen. If your kitchen is cool, try turning on the oven for a few minutes, then turning it off and placing the dough inside to rise.
– Timing: Be patient. A longer rise allows for more flavor development and a better texture. If your dough hasn’t doubled after 2 hours, give it more time.
– Check for Proper Kneading: The dough should be smooth and elastic. If it tears easily, it may need more kneading.
Comprehensive Guide to Creating the Cheesecake Filling
While the dough rises, you can prepare the luscious cheesecake filling that will be encased within the Danish.
1. Ingredients: In a medium bowl, combine 8 ounces of cream cheese (softened), 1/2 cup of granulated sugar, 1 teaspoon of vanilla extract, and 1 large egg.
2. Mixing for Smooth Consistency: Using an electric mixer, beat the ingredients together on medium speed until the mixture is smooth and creamy. Ensuring that your cream cheese is at room temperature is crucial; this helps to achieve a lump-free filling.
3. Folding in Ingredients: If you plan to add crushed pineapple (about 1/2 cup), gently fold it into the cheesecake mixture with a spatula. Be careful not to over-mix; the goal is to incorporate the pineapple without deflating the mixture.
Instructions for Rolling Out the Dough and Cutting It Into Squares
Once the dough has risen, it’s time to shape it into squares for the Danishes.
1. Rolling Out the Dough: On a floured surface, punch down the dough to release the air. Roll it out into a large rectangle, about 1/4 inch thick.
2. Cutting the Dough: Using a sharp knife or pizza cutter, cut the dough into square pieces (approximately 4×4 inches). A ruler can be helpful for uniformity.
Assembly of the Danishes
Assembling the Danishes is where the magic truly happens. Follow these steps for the perfect assembly.
1. Filling the Squares: Place about 1 tablespoon of the cheesecake filling in the center of each square. Be careful not to overfill, as this can cause issues during baking.
2. Sealing and Shaping: To seal the Danishes, fold each corner of the square toward the center over the filling and pinch to secure. Alternatively, you can leave the center open for a more traditional look, creating a sort of pocket.
3. Visual Descriptions: The dough should form a beautiful, puffed shape around the filling. The edges should be pinched firmly to avoid any leakage during the baking process.
Baking Process
Now that your Danishes are assembled, it’s time to bake them to golden perfection.
1. Preheat the Oven: Preheat your oven to 375°F (190°C). This temperature is crucial for achieving a golden-brown finish.
2. Baking Time: Arrange the assembled Danishes on a parchment-lined baking sheet, ensuring they are spaced apart to allow for expansion. Bake for 20-25 minutes or until they are golden brown.
3. Indicators of Doneness: Check the Danishes towards the end of the baking time. They should be puffed up and golden, with a slight sheen from the egg wash if you brushed them before baking.
Creating the Pineapple Glaze
To complement your Tropical Delight Hawaiian Cheesecake Danishes, a pineapple glaze adds a sweet and tangy finish.
1. Ingredients: In a saucepan over medium heat, combine 1 cup of crushed pineapple (with juice), 1/2 cup of granulated sugar, and 2 tablespoons of cornstarch mixed with 1 tablespoon of water.
2. Cooking the Glaze: Stir the mixture constantly until it thickens, about 5-7 minutes. Once thickened, remove from heat and let it cool slightly. Timing is key; preparing the glaze while the Danishes are baking ensures it’s fresh when you’re ready to glaze.
Final Assembly and Presentation
Once your Danishes are baked and the glaze is ready, it’s time for the final touches.
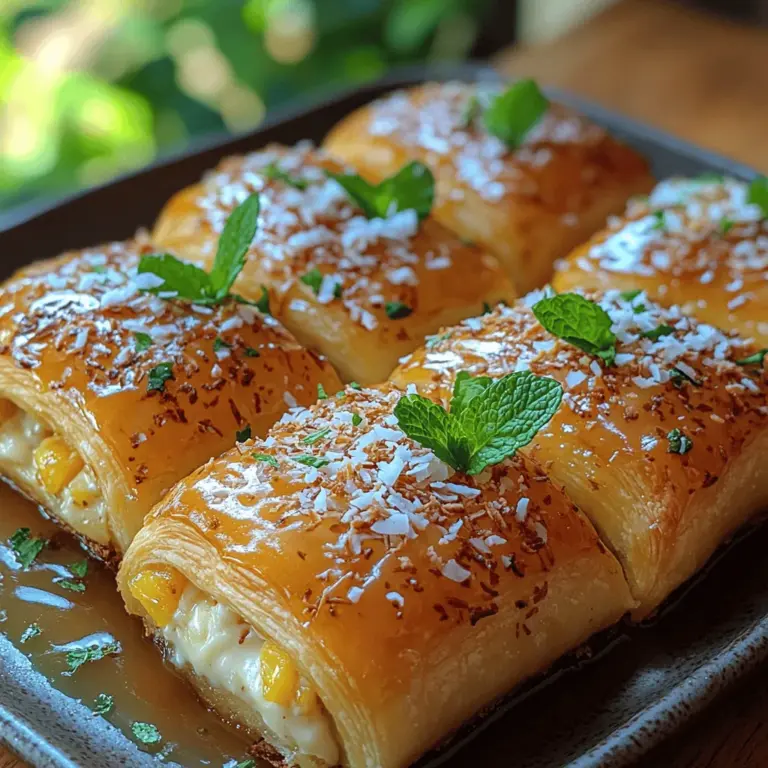
1. Glazing the Danishes: Use a pastry brush to apply an even coat of the pineapple glaze over each Danish. This not only adds flavor but also enhances the visual appeal.
2. Garnishing: For a tropical flair, sprinkle sweetened coconut over the glaze and garnish with fresh mint leaves. The coconut adds texture, while the mint offers a refreshing contrast.
3. Importance of Presentation: Beautifully presented desserts elevate the dining experience. Consider serving the Danishes on a colorful platter or with tropical-themed decorations for an added touch.
Serving Suggestions and Pairings
Your Tropical Delight Hawaiian Cheesecake Danish is versatile and can suit a variety of occasions.
1. Serving Ideas: These Danishes are perfect for brunches, dessert tables, or casual gatherings. They can be served warm or at room temperature, making them great for any setting.
2. Beverage Pairings: Complement the rich flavors of the Danishes with a cup of coffee or tea. For a more tropical experience, serve with fresh fruit juices or a light tropical smoothie.
3. Occasions: Consider these Danishes for summer parties, holiday gatherings, or even as a thoughtful gift for friends and family. Their vibrant flavors will surely impress.
Nutritional Information
Understanding the nutritional content of your Tropical Delight Hawaiian Cheesecake Danish can help you enjoy them mindfully.
1. Overview of Nutritional Content: Each Danish contains approximately 300 calories, with a balance of carbohydrates, fats, and sugars. While they are indulgent, they can be enjoyed in moderation.
2. Portion Control and Indulgence: Consider serving smaller portions for larger gatherings, allowing guests to enjoy the tropical flavors without overindulging.
Conclusion
Creating and sharing the Tropical Delight Hawaiian Cheesecake Danish is a delightful experience that brings a taste of the tropics right into your kitchen. Each step, from mixing the dough to glazing the finished product, is filled with the joy of baking. This recipe not only satisfies your sweet tooth but also has the power to brighten any occasion.
As you embark on this culinary adventure, don’t hesitate to explore variations of the recipe by incorporating different fruits or flavors. Enjoy the process of baking and the smiles that come from sharing your delicious creations with loved ones. Embrace the tropical vibes and let the Tropical Delight Hawaiian Cheesecake Danish be a sweet reminder of sunny days and joyful gatherings.
