Cheesy Bites on a Stick: A Delectable Snack Recipe

WANT TO SAVE THIS RECIPE?

Cheesy Bites on a Stick Recipe

Introduction

Cheesy bites are more than just a snack; they are a delightful experience that brings people together. Whether it’s a casual family dinner, a lively gathering with friends, or a festive party, the allure of cheese and bread is hard to resist. Cheesy bites on a stick offer a fun and interactive way to enjoy a classic dish while adding a creative twist that delights both the young and the young-at-heart. This finger food not only embodies comfort but also encourages sharing and socializing, making it an ideal choice for any occasion.

In today’s fast-paced world, easy and delicious recipes are essential for hosting memorable get-togethers. Cheesy Bites on a Stick stand out because they combine the beloved flavors of grilled cheese sandwiches with the playful presentation of skewers. This innovative recipe allows for personalized variations, ensuring that every guest can enjoy their favorite cheesy combination. With this recipe, you’ll learn how to make these scrumptious bites that are not only easy to prepare but also packed with flavor.

The Allure of Grilled Cheese

Grilled cheese sandwiches have a rich history that dates back to the early 20th century. They gained popularity during the Great Depression as an affordable meal option, using just bread and cheese. Over the years, this humble dish evolved, with variations popping up across cultures. From the classic American version made with cheddar to gourmet twists featuring brie and artisan breads, grilled cheese has become a beloved staple in many households.

The charm of grilled cheese lies in its simplicity; however, it is the endless permutations that keep it exciting. Some people add tomatoes or bacon, while others experiment with different types of cheeses or spreads. The concept of Cheesy Bites on a Stick takes this classic and elevates it to a new level, allowing for a fun presentation that is perfect for sharing. By skewering cheesy morsels, this dish invites creativity and customization, making it a hit at any gathering.

Ingredients Overview

To prepare Cheesy Bites on a Stick, you’ll need a selection of key ingredients that contribute to both flavor and texture. Here’s a detailed overview of what you’ll need:

Bread Options: The choice of bread greatly impacts the final outcome of your cheesy bites. Sourdough offers a tangy flavor and a chewy texture, while whole grain provides a nutty taste and added nutritional benefits. White bread, on the other hand, delivers a soft and classic experience. Each option brings its own unique characteristics, allowing for personal preference in the final dish.

Cheese Selection: The cheese is the star of the show in this recipe, and the selection you make will influence the taste and melting qualities of your bites. Cheddar is a popular choice due to its sharp flavor and excellent melting properties. However, feel free to explore alternatives like mozzarella for a gooey texture, gouda for a rich taste, or pepper jack for a spicy kick. Combining different cheeses can also create a more complex flavor profile.
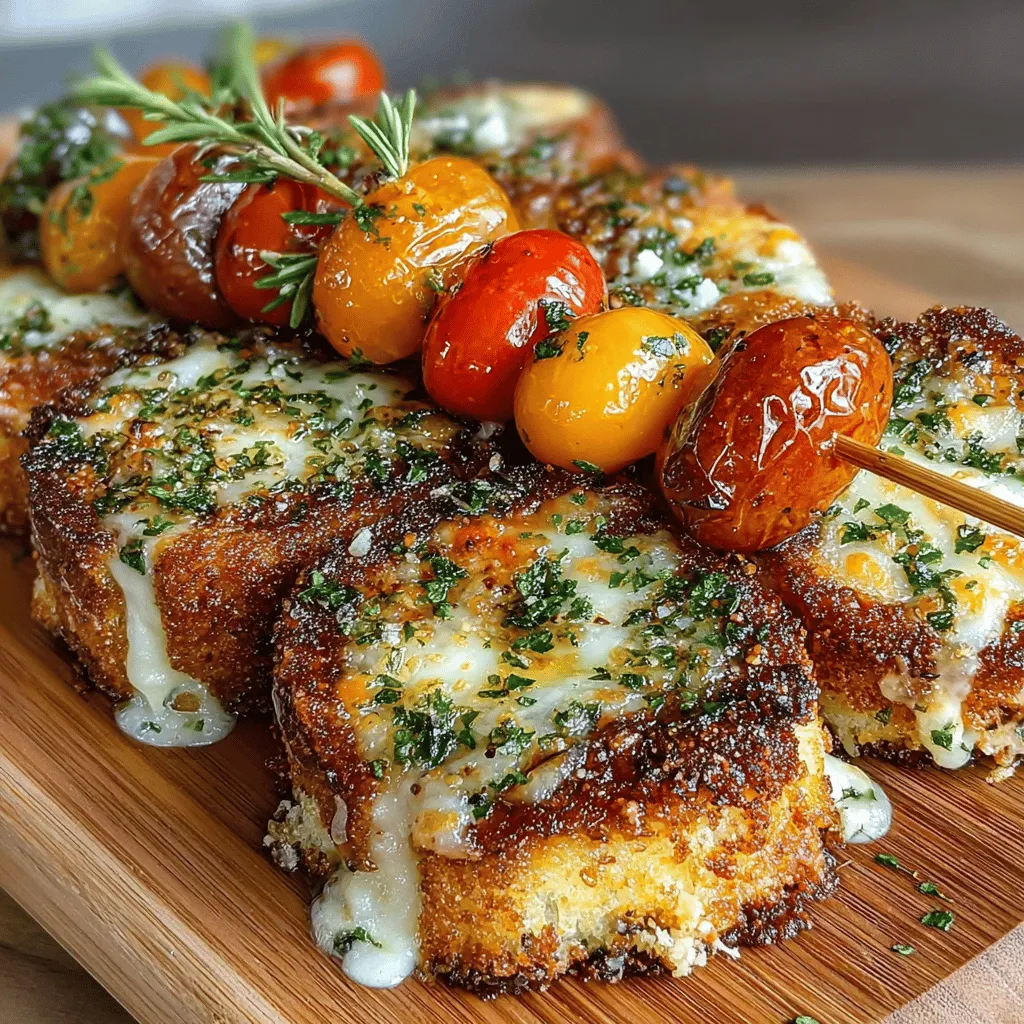
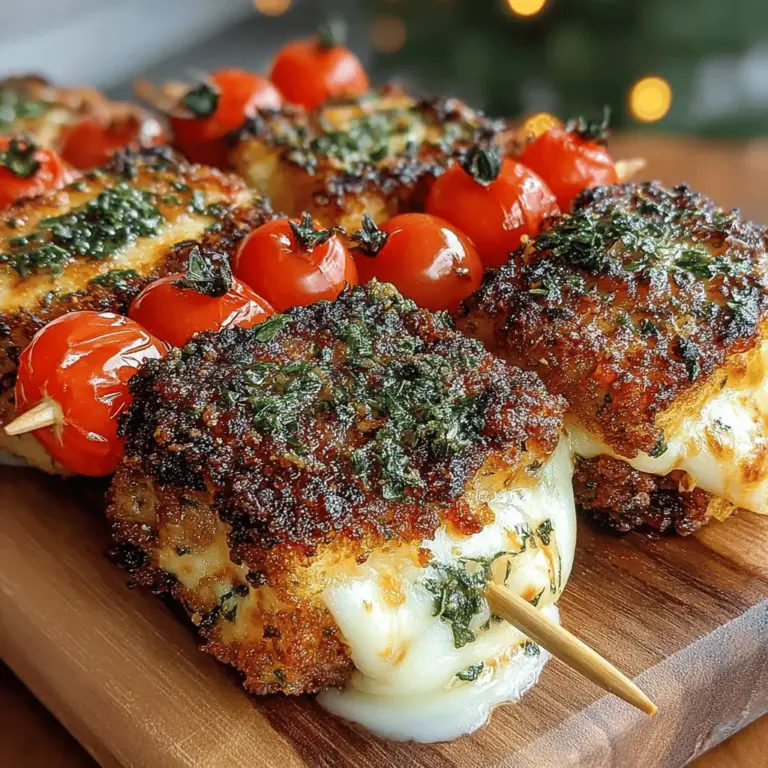
Cherry or Grape Tomatoes: Adding cherry or grape tomatoes introduces a burst of freshness and acidity that beautifully complements the richness of the cheese. These bite-sized tomatoes are not only tasty but also packed with vitamins and antioxidants, enhancing the nutritional value of your cheesy bites.

Seasonings: Seasoning is crucial in elevating the overall flavor of the dish. A sprinkle of garlic powder can add depth and warmth, while oregano provides an herbal note that pairs well with cheese. Don’t forget the essentials: salt and pepper, which enhance all the ingredients and bring balance to the dish.

Butter: To achieve that coveted golden, crispy exterior, butter is essential. It not only adds flavor but also helps in creating a beautifully toasted surface that contrasts with the gooey cheese inside.

Equipment Needed: To bring this recipe to life, you’ll need wooden or metal skewers for threading the cheesy bites. If you opt for wooden skewers, remember to soak them in water for at least 30 minutes prior to grilling. This prevents them from burning on the grill. Additionally, having grilling tools like a spatula and tongs will make the cooking process smoother.

Preparation Steps

Now that you have a clear understanding of the ingredients, let’s dive into the preparation steps for Cheesy Bites on a Stick. The first step in making these delightful snacks is to prepare your skewers. If you are using wooden skewers, soaking them is crucial. This process not only prevents the skewers from catching fire during grilling but also helps them maintain their structural integrity when loaded with cheese and bread.

Once your skewers are ready, you can begin assembling your Cheesy Bites. Start by cutting your bread into bite-sized squares that can easily fit onto the skewers. Aim for uniform pieces that will cook evenly. Next, choose your cheese and slice it into similar-sized squares or rectangles, ensuring that they will melt nicely between the bread.

If you are incorporating cherry or grape tomatoes into your skewers, wash them thoroughly and set them aside. You can alternate between bread, cheese, and tomatoes on the skewers for a visually appealing presentation. This not only enhances the flavor but also creates a colorful platter that is sure to impress your guests.

Next, season your assembled skewers with a light sprinkle of garlic powder, oregano, salt, and pepper. This step is essential for maximizing flavor; the seasoning should coat all the components to ensure every bite is delicious. Once seasoned, brush the skewers lightly with melted butter, which will help achieve that perfect golden crust during grilling.

With your skewers prepared and ready to go, you are well on your way to creating a deliciously interactive snack that will delight everyone at your gathering. The next steps will involve grilling the skewers to perfection, but first, let’s take a moment to appreciate the delightful journey you are about to embark on with these Cheesy Bites on a Stick.

Stay tuned for the next part where we will cover the grilling process and tips for serving these tasty bites!

<strong>Introduction</strong>” /></p>
</p>
<h2>Step-by-Step Assembly of Mini Grilled Cheese Sandwiches</h2>
</p>
<p>To create the perfect Cheesy Bites on a Stick, start by assembling the mini grilled cheese sandwiches. For optimal cheese melting, choose cheeses that melt well, such as sharp cheddar, Gruyère, or a combination of mozzarella and provolone.</p>
</p>
<h3>Ingredients for Mini Grilled Cheese Sandwiches</h3>
<p>– Bread slices (white, whole grain, or sourdough)</p>
<p>– Cheese of choice (sharp cheddar, mozzarella, or Gruyère)</p>
<p>– Seasoned butter mixture (see below for preparation)</p>
</p>
<h3>Instructions for Assembly</h3>
<p>1. <strong>Cut the Bread</strong>: Begin by cutting your bread into quarters or small squares, depending on your preferred size for the bites. This makes handling easier and allows for quicker grilling.</p>
</p>
<p>2. <strong>Prepare the Cheese</strong>: Slice the cheese into squares that are slightly smaller than the bread pieces. This ensures that the cheese melts evenly and does not overflow during grilling.</p>
</p>
<p>3. <strong>Create the Seasoned Butter Mixture</strong>: Melt 4 tablespoons of unsalted butter in a small bowl. Mix in garlic powder, onion powder, a pinch of salt, and freshly cracked black pepper. This flavored butter adds a rich depth to your mini sandwiches.</p>
</p>
<p>4. <strong>Butter the Bread</strong>: Generously spread the seasoned butter mixture on one side of each bread piece. Ensure even distribution to achieve a uniform golden crust when grilled.</p>
</p>
<h3>Assembling the Skewers</h3>
<p>1. <strong>Layering</strong>: Take one piece of bread and place a slice of cheese on top. Add another piece of bread on top of the cheese, buttered side up. Repeat this process, stacking two or three mini sandwiches per skewer, depending on your preference.</p>
</p>
<p>2. <strong>Creative Variations</strong>: Consider adding thin slices of tomatoes, cooked bacon, or sautéed spinach between the layers for an extra flavor kick. This not only enhances the taste but also adds visual appeal to your skewers.</p>
</p>
<p>3. <strong>Presentation Ideas</strong>: For a fun presentation, use themed wooden skewers for different occasions, such as holiday-themed ones. Arrange the skewers on a serving platter, garnished with fresh herbs or colorful veggies for an attractive display.</p>
</p>
<h2>Grilling Process</h2>
</p>
<h3>Preheating the Grill</h3>
<p>For the best results, preheat your grill or grill pan over medium heat for about 5-10 minutes before placing the skewers on it. This ensures that the bread crisps up nicely and the cheese melts perfectly.</p>
</p>
<h3>Grilling Instructions</h3>
<p>1. <strong>Placing the Skewers</strong>: Once the grill is hot, place the skewers on the grill, ensuring they are not overcrowded. This allows the heat to circulate evenly and prevents sogginess.</p>
</p>
<p>2. <strong>Timing for Perfect Results</strong>: Grill the skewers for about 2-3 minutes on each side. Keep an eye on them to ensure that they do not burn. The goal is to achieve a golden brown crust while ensuring the cheese inside is melted.</p>
</p>
<p>3. <strong>Visual Cues for Doneness</strong>: Look for a bubbly appearance in the cheese and a golden-brown color on the bread. Use tongs to flip the skewers carefully, making sure to handle them gently to avoid any cheese spillage.</p>
</p>
<p>4. <strong>Safety Tips</strong>: When removing the skewers from the grill, use heat-resistant gloves or tongs to prevent burns. Let the skewers cool for a minute before serving, as the cheese can be extremely hot.</p>
</p>
<h2>Serving Suggestions</h2>
</p>
<h3>Presentation Styles</h3>
<p>Serve your Cheesy Bites on a Stick on a rustic wooden board or a colorful platter. To elevate the experience, consider adding small bowls of dipping sauces such as marinara, ranch, or a spicy aioli alongside the skewers.</p>
</p>
<h3>Pairing with Tomato Soup</h3>
<p>A classic pairing with grilled cheese is tomato soup. The acidity and sweetness of the soup perfectly balance the richness of the cheese, creating a comforting and satisfying meal. Serve the soup in small cups or bowls for easy dipping.</p>
</p>
<h3>Recipe Variations</h3>
<p>Feel free to experiment with the base recipe by adding different ingredients:</p>
<p>– <strong>Vegetables</strong>: Incorporate slices of avocado, bell peppers, or sautéed mushrooms for added nutrition and flavor.</p>
<p>– <strong>Cheeses</strong>: Mix and match various cheeses like feta, blue cheese, or pepper jack to create unique flavor profiles.</p>
</p>
<h2>Nutritional Information</h2>
</p>
<h3>Nutritional Benefits</h3>
<p>This recipe offers a delightful combination of protein and carbohydrates while presenting a good source of calcium from the cheese. Whole grain bread can increase fiber content, making it a more balanced snack or meal option.</p>
</p>
<h3>Portion Control</h3>
<p>While these cheesy bites are delicious, moderation is key. Each serving can be adjusted to fit individual dietary needs. Aim for 2-3 skewers as a satisfying portion, especially when paired with a side like tomato soup.</p>
</p>
<h3>Modifications for Dietary Needs</h3>
<p>For those with dietary restrictions, it’s easy to modify this recipe:</p>
<p>– <strong>Gluten-Free Option</strong>: Substitute regular bread with gluten-free bread.</p>
<p>– <strong>Dairy-Free Option</strong>: Use plant-based cheeses and dairy-free butter alternatives to create a similar flavor profile while accommodating lactose intolerance or dairy allergies.</p>
</p>
<h2>Conclusion</h2>
</p>
<p>Making Cheesy Bites on a Stick is not just about creating a tasty snack; it’s about the joy of cooking together and sharing delicious food with loved ones. This recipe is perfect for gatherings, casual family meals, or a fun weeknight dinner. Encourage everyone in the family to get involved in the assembly and grilling process, fostering a sense of togetherness.</p>
</p>
<p>Whether you stick with the original recipe or explore variations, these cheesy bites are sure to become a staple in your culinary repertoire. Get creative, enjoy the process, and savor the delightful flavors that come from cooking with heart. Embrace the joy of food and the memories created around the table as you indulge in these Cheesy Bites on a Stick.</p>
</div>

Introduction

Mini Grilled Cheese & Tomato Skewers

Discover the joy of Cheesy Bites on a Stick, a fun twist on classic grilled cheese sandwiches perfect for any gathering. These delightful bites combine various cheeses, flavorful seasonings, and fresh tomatoes, all skewer for easy sharing. Learn how to assemble and grill these tasty morsels to achieve a crispy exterior and gooey interior. Ideal for parties or family meals, this interactive recipe encourages creativity and brings everyone together for delicious moments.

Ingredients
  

8 slices of bread (your choice: sourdough, whole grain, or white)

8 slices of cheddar cheese (or your favorite cheese)

8 cherry or grape tomatoes

4 tablespoons unsalted butter, softened

1 teaspoon garlic powder

1 teaspoon dried oregano

Salt and pepper, to taste

Skewers (wooden or metal)

Instructions
 

Prepare the Skewers: If using wooden skewers, soak them in water for about 30 minutes to prevent burning. Preheat your grill or grill pan over medium heat.

    Assemble the Sandwiches: Take 2 slices of bread for each mini sandwich. Place a slice of cheese between them to create 4 mini grilled cheese sandwiches.

      Season the Butter: In a small bowl, mix the softened butter, garlic powder, oregano, salt, and pepper until well combined.

        Butter the Bread: Generously spread the seasoned butter mixture on the outer sides of each mini grilled cheese sandwich.

          Skewer it Up: Cut each sandwich into quarters (or triangles for a fun variation). Thread one piece of the grilled cheese followed by a cherry tomato onto each skewer. Repeat, alternating between cheese and tomato until the skewer is filled (leaving some space at the ends for handling).

            Grill the Skewers: Place the skewers on the preheated grill. Cook for about 2-3 minutes on each side, or until the bread is golden brown and the cheese is melted.

              Serve: Remove from the grill and let them cool for a minute. Serve warm, ideally with a side of tomato soup for dipping, or on their own for a delightful snack!

                Prep Time, Total Time, Servings: 15 minutes | 25 minutes | 4 servings

                  WANT TO SAVE THIS RECIPE?

                  Leave a Comment

                  Recipe Rating